After teaching in primary classrooms for twenty years, you learn a few tips and tricks to help students with their scissor skills! Children need a lot of exposure to scissor practice to become successful and confident learners in future grade levels where they use more difficult cutting skills.
WHY ARE SCISSOR SKILLS IMPORTANT?
Cutting with scissors not only builds fine motor skills, but also helps to develop hand-eye coordination in young students. When students feel confident with their coordination, they tend to complete tasks quickly and correctly when fine motor skills are needed in other activities.
TIPS
If the child has never used scissors before, you will want to do a few activities with them before they get a pair of scissors. First, let students put some fine motor skills to the test by tearing paper into small pieces. Let that prior knowledge lead them to the reason why we use scissors. If they want to cut a line with precision, scissors are the tool to help them do it.
RULES
Next, cover the rules. The main rule with scissors is to teach students that they only cut paper when they first learn how to cut things. If you don’t remind them repeatedly, they tend to try cutting things like hair or shoelaces while exploring. Another rule that proves useful is how to hold the scissors if you are walking with them. Tell them they should never run with scissors because it is dangerous. Students should hold them by wrapping their hand around the tip. Finally, show students how to hold scissors correctly.
TEACHING KIDS HOW TO HOLD SCISSORS THE RIGHT WAY
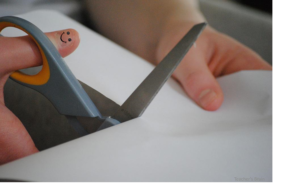
If the child is using regular safety scissors, a good tip to help your child remember how to position their hand is to draw a smiley face on the thumbnail of their cutting hand. Remind your child that they should always be able to see the smiley face while they’re cutting paper. This will prevents the child from turning their hand upside down while cutting.
Give students lots of practice by letting them begin with cutting straight, curvy or zigzag lines. Once they find those skills easy, it’s time to learn how to cut shapes out of the middle of images or other shapes.
HOW TO CUT THE MIDDLE
If the item is soft and flexible like paper, fold it in half so you can see half of the image you are cutting out on either side. Using sharp safety scissors, cut a small slit in the center. Be careful not to cut past the marked edge of the part you are cutting out. Then, stick the tip of the scissors in the slit and proceed to cut around the marked edge of the part you are cutting out.
Another option is to use a hole punch in the center of the part you want to cut out. Then, use that hole as a starting point with scissors.